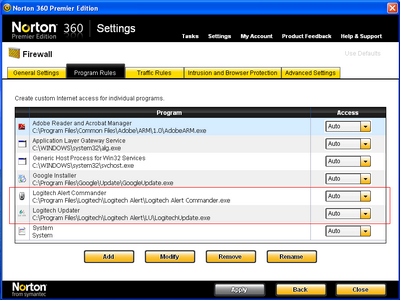
The Norton 360 Premier Edition firewall automatically set Logitech Alert Commander access to “Auto”. So you may not experience any warning notices from the Norton 360 firewall when installing Commander, finding/discovering cameras, or updating Commander.
However, if you do encounter any “allow access” or “block” warning messages during the installation and setup process, always select “Allow access.”
Troubleshooting
If you encounter consistent “allow access” warning messages for Logitech Commander, please follow these instructions to set access functions:
1. Open Norton 360 Premier.
2. Place your mouse over the “PC Security” option and select “Manage Firewall.”

3. Click on the tab called “Program Rules.” In the list of programs, you will see that Logitech has 2 programs: Logitech Alert Commander and Logitech Updater.

4. Modify the Access settings from “Allow” and then click the Apply button.

Troubleshooting
If setting both Access options to “Allow” does not stop the warning messages, set the Access options to “Custom”.
When you change the setting to “Custom”, the Rules window displays.

1. Click the Modify button.

2. On the Action tab screen, make sure the setting is “Allow”.
3. On the Connections tab screen, make sure the setting is set to “Connections to and from other computers”.
4. On the Computers tab screen, make sure the setting is set to “Any computer”.
5. On the Communications tab screen, make sure the setting is set to “All”.
6. When you are finished modifying any settings, click Ok.
7. On the Firewall screen, click Apply.
8. Click Close.
9. Shut down Norton 360 by clicking on the Exit icon [X].